Showing posts with label General Cards. Show all posts

Wednesday, November 18, 2009

A special little fairy...


I made this card for Jaimie, the little girl who has gone through more than anyone should ever have to go through. (Click HERE for the blog and the story.)
Her favorite colors are hot pink and black, and while I know they said she is not very girly girl, who can't resist a fairy in your favorite colors?
Stamps: Inkadinkado "Beautiful Fairies"
Ink: StazOn Jet Black
Paper: Basic Grey
Markers/Coloring: Copics-G21, G24, G28; Sharpies, Crayola colored pencils, Gelly Roll Shimmer Dust and fluorescent pink, Pink glitter marker
Others: Prima Flowers, pearls, Fiskars Scallop Punch

Tuesday, November 17, 2009

Toadstool House


This is the same design that I used on the card that I posted yesterday, and I feel absolutely terrible that I can't remember where I found this card layout! If anyone knows, I'd love to be reminded! :)
A friend of mine recently purchased her first home, and since I don't seem to have a lot of "house" stamps, I decided to step outside the box and use this adorable toadstool from Hero Arts. And I got to use my new Copic markers!!!! I don't know how I've gone this long without Copics...now that I have them, coloring with anything else is nowhere near as fun!
Stamps: Hero Arts "Woodland Creatures", TPC "Woodland Whimsy"
Ink: StazOn Jet Black, Colorbox Olive Green Pastel
Markers: Copics- G21, G24, G28
Paper: Basic Grey
Other: Cuttlebug Embossing Folder

Wednesday, March 18, 2009

Spring Spring Spring is in the Air!

Hi everyone! I just love this time of year...the anticipation of warmer weather, the blue skies and green grass. I love the changing of seasons-it's that short moment where the old season is passing away, and the new season is heading on in with promises of a great few months, you know?

So, to celebrate the change of seasons, and the fact that I have an awesomely unique little sis, I made a springy Trifold card to send to her. I forgot to take a picture of the card fully closed, so you'll have to imagine it...sorry! And I only got a mediocre picture of the inside. But, here's the card:


Stamps: Hero Arts Spiral Flower (D4741), Woodland Creatures (CL261)
Ink: ColorBox Chalk Inks and Versa Fine Jet Black
Patterned Paper: Basic Grey
Thanks for looking!

Wednesday, March 11, 2009

Welcome Home!!!

Hello everyone!

My dear hubby is away on business, and gets home tomorrow, so I thought I'd make him a "Welcome Home" card. He's only been gone a few days, but I've missed him tons!


I made this a slider pop up card, and it took just a little bit of tweaking to get it to work with the house shape. To make the door and windows, I used the "Hope your birthday is Huge" sentiment from Hero Arts Elephants set, inked only the border and stamped it. Then I cut Basic Grey curtains to make fabric. Oh, and that little mouse that's jumping for joy used to be wearing pants, but I just had to make her "girly"....so I changed the pants into the skirt and made her shirt all ruffly!
Thanks for looking!

Stamps: Hero Arts CL261 Woodland Creatures and CL280 Elephants
Ink: ColorBox Chalk Ink Olive Pastel and Chestnut Roan, VersaFine Jet Black
Patterned Paper: Basic Grey
Markers: Close to My Heart

Sunday, March 1, 2009

Sunday Faithfulness...

Good morning everyone! And happy March! Can you believe it is here already?

I wanted to share one of the cards I made for one of the WinterHaven challenges over at stamphaven.com. I made this card for the Naked Stamping Challenge, and the rules were that you could only use:

1) White and/or cream-colored cardstock
2) At least THREE stamps
3) Ink - brand(s) and color(s) of your

I thought this one would be really hard, but it turned out being one of my favorite challenges. Normally I love using tons of bling and BasicGrey paper :) but it was a nice change to use my own style and make a card completely unique to me.

So, without further ado, here it is:


I used three stamps: Autumn Leaves Flowers, Autumn Leaves scrolls, and Stampabilities sentiment.

I used the flower for the background of the card...and used masking to make all the different colors. I have three colors total used on the card: Olive Pastel, Cocoa, and Dark Brown. (All ColorBox inks)

To make the strip, cut the cream cardstock, and pressed the cocoa ink pad directly onto it. Then I stamped the scroll in cocoa and Olive Pastel ink, and inked the edges with the dark brown ink.

After that, I finished up by stamping the flowers with Olive pastel, cut them out, inked the edges with Dark Brown, and used dimensionals to stagger the flowers.

Last, I stamped the sentiment on with Olive Pastel Ink, inked the edges with cocoa ink, and put the card all together!

Thanks for looking!

Tuesday, February 10, 2009

An adorable elephant and my favorite stamp of all time...

Good afternoon everyone!

I think my "Happy Spring" card worked...it is really starting to feel like Spring. Well, temporarily, that is. It is supposed to get cold again. But I have to say, the rain and the sunshine and the 55 degree weather yesterday really inspired me to create a little! Much more than I've been inspired lately. So, I just had to share some of my projects.

The first card is one I made for this week's HeroArts challenge...you have to use your favorite HeroArts product. I still have to upload it the to the gallery, but I wanted to put it on here first!

My favorite Hero Arts stamp is the French Script stamp...and I used it with the French themed collage stamp by HeroArts as well. Oh, and I was so happy when I remembered that my Cuttlebug Script Embossing Folder matched perfectly!


Stamps: Hero Arts Collage Take Time (H4777) and Old French Writing (H2365)
Embossing Folder: Cuttlebug Script Texture
Ink: VersaFine Jet Black, ColorBox Chalk Ink Chestnut Roan and Charcoal
Icicle Stickles, Prima Flowers, Clear Rhinestones

I made this next card with stamps from Unity Stamp Co. and Heidi Grace. I stamped the flower image with purple ColorBox Ink (I can't remember the name though...sorry!) and embossed it with clear embossing powder, then used some Stickles to accent the flowers.


Stamps: Unity Stamp Company "Spring in the Mail" and Heidi Grace
Ink: Colorbox and VersaFine Jet Black
Scallop scissors, icicle stickles, clear embossing powder

And the last project I am sharing with you today is the little notebook I covered up. It is one of those $1 notebooks from Michael's, and I covered it with cream cardstock. The stamps are from HeroArts...and they are one of their new releases! I just love these little elephants!!!


Stamps: Hero Arts Elephants (CL280)
Ink: VersaFine Jet Black, Brilliance Pearlescent Orchid, and ColorBox Chalk Inks Olive Pastel, Lavendar, Blue Lagoon, Lipstick, Charcoal, and Orchid Pastel
Patterned Paper: BasicGrey Eva "Noble"
Icicle Stickles, Scalloped edge scissors by ProvoCraft

Well, thanks for looking at all of them! I hope you have a great day!

Thursday, January 29, 2009

I couldn't pick just one!

I have 3 cards to share today...I loved all of them and kind of felt bad for wanting to choose one over the other. (Is it bad that I am getting emotionally attached to my cards?)

OK, so the first card is this little baby kitten one. My mom got me that adorable Baby Kitty stamp for Christmas this year, and I just love it...it makes me want to go get another kitten.


As always, I inked the edges with Colorbox Chalk Ink. Seriously, if they ever stop making that ink, I don't know what I'll do with my paper edges!

Stamp: Penny Black
Patterned Paper: DCWV
Ribbon: Offray
Markers: Close to My Heart "Spring Blossom"
Ink: ColorBox Chestnut Roan Chalk Ink (edging), VersaFine Jet Black (stamped image)

And this next card is another little bitty one...it's a lot of fun to challenge yourself to make something big out of something so small. It measures in at 4"x4". I used my crystal Stickles on each of the middle parts of the BasicGrey flowers, it's much sparklier in real life.


Stamps: Hero Arts ( f4899, cl182)
Paper: Basic Grey Urban Prairie "Ladybug"
Ink: ColorBox Amber Clay Chalk Ink (edging), VersaFine Jet Black (stamped images)
Ribbon: Offray
Crystal Stickles

And to hopefully convince Spring to get here sooner, I made this Happy Spring card. (If I make spring cards, it has to be spring, right?) Inkadinkado's Patterned Bugs stamps set is beautiful! (Thank you Mom for getting it for me!) I used my Cuttlebug embossing folder "Perfectly Paisley" on the Basic Grey Paper. (And sorry for the crooked scan...it didn't want to cooperate, and after 5 tries I gave up!)


Stamps: Inkadinkado "Patterned Bugs"
Paper: Basic Grey Urban Prairie "Bluebird", "Morning Glory", and "Straw"
Flowers: Prima Marketing "Limeade"
Embossing Folder: CuttleBug Perfectly Paisley
Ink: ColorBox Charcoal Chalk Ink (edging), VersaFine Jet Black (stamped image)
Markers: Close to my Heart "Spring Blossom"
Black Rhinestones, Crystal Stickles

Thanks for looking at all 3! I'm sure they all feel better about themselves since none of them have been left out! :)

Have a good day!

Monday, January 26, 2009

Chocolate Chip Cookie Card

I am making chocolate chip cookies to send to two friends of mine, and I just wanted to share the cute little chocolate chip cookie cards I made to put on top of the containers! I colored the chocolate chips in, and I love how it makes the cookies just pop!


Cardstock: DCWV
Stamps: Hero Arts, Inque

Thanks for looking!

A Spring Winter "Hybrid"...

You know that feeling when it is towards the end of January, it is still freezing out, and you are making a winter themed card, but can't stand to see any more blue and white? I had that feeling when I made this next card. SO, I decided to change it up a little.

Hero Arts has that adorable Christmas Owls stamp set, and while I didn't end up using them for my Christmas cards (like I thought I would), they have become indispensable for winter cards. How can anyone resist these adorable owls bundled up in cute little sweaters? I sure couldn't!!!


I took my Basic Grey Urban Prairie Corn Husk paper, ran it through my Cuttlebug (I love that thing!) with the Snow Dots embossing folder, and then used some ColorBox Chestnut Roan chalk ink to bring the embossing out...just a few strokes here and there and what was originally an optical illusion type embossing turned out quite well instead!

Oh, and then I took my Prima flowers (they are the Autumn Green ones) and used Crystal stickles on four of the flowers and I used the small snowflake stamp that comes with the Christmas owls on the other three. Didn't those turn out adorable!

And of course the final touch is that adorable little owl in his warm little sweater! Too cute!

Stamps: Hero Arts (cl238) Owl Christmas
Paper: Basic Grey Urban Prairie Corn Husk
Flowers: Prima Flowers Autumn Green
Stickles, Crystal; Brown Rhinestones

Sunday, January 11, 2009

Love Birds

My parents celebrated their anniversary this past week, and I just wanted to share the "Love Birds" card that I made for them.


I used Hero Arts Happy Everything stamps that I picked up on sale at Joann's (can't beat $6!). I also used some self adhesive patterned paper I had picked up at Target a year or two ago. I can't remember the name of it though...

And, I got to use my new Cuttlebug that my parents got me for Christmas!!!! I used the Olivia alphabet to cut out the "LOVE" and adhered it onto cream cardstock. Then I inked the edges with ColorBox Chocolate and Blueberries Ink Queue. I cut out a 2 1/2 circle out of brown cardstock, inked the edges, stamped the birds, and colored them with plain old Crayola colored pencils.


Thanks for stopping by!

Tuesday, November 25, 2008

Warm Wishes Card using embossing resist


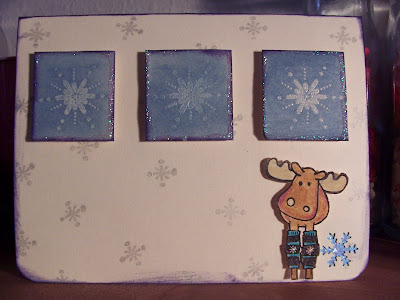
I made this card for a friend of mine...I used the snowflake from the Hero Arts Owl Christmas clear stamp set, and the moose, small snowflake (on background of card in silver) and polar bear are from a stamp set that WalMart has out for the holidays (only $2.97!!!!). I used my corner punch to round the edges of the card, and then punched a small snowflake (I used the Marvy small snowflake punch) out of the corner. I put a little piece of blue paper behind the snowflake punch. You can't see it very well in this picture, but the snowflake and a little bit of the moose's leg warmers are sparkly-I added some Crystal Stickles to the card to make it pop a little.

I stamped the Hero Arts snowflakes on the three pieces of cream cardstock with Brilliance Moonlight White Ink, heat embossed them with clear embossing powder, and used my ranger foam blender to blend some chalk ink over the stamp. It makes this really cool look. Then I added a little bit more stickles to the border of the three blocks. I adhered them with 3D dots, and adhered the colored moose with more 3D dots (but the thinner kind) to complete the card.

And because I just love getting adorable envelopes in the mail, I decorated the envelope to match the card. I stamped the snowflakes (from Hero Arts) with ColorBox Chalk color Blue Iris. I stamped the adorable little polar bear, and then used Gelly Roll Souffle Pen on his scarf to give it a little texture.

Oh, and here's a close up of the card (sorry the picture's not the greatest!):


Thanks for looking!

Monday, November 10, 2008

A Parisian Love Affair...

Ever since I took french in high school, I have been in love with France, and especially Paris. I almost had the opportunity to go to Paris my senior year, but 9/11 happened so they cancelled the trip. And now, I have started to brush up on my French and I dream of the day that my husband and I take the trip there. It will be when we are retired most likely, and when I have overcome my fear of flying...but anyways. So until then, I have to comfort myself with looking at photos of Paris, dreaming of decorating my scrapbook room in a Parisian style, and most recently, making lots of cards with French script and the Eiffel Tower!

So, here are some of the cards I made:


The Eiffel Tower stamp is by Stampabilities, and the French Script stamp is by Hero Arts. All Patterned Paper is by Making Memories. On the second and third card, I used masking techiniques that I learned over at twopeasinabucket.com during their stamp camp. The link to the class is here. The second card I used the reversed masking technique on to create round area of french script, and the third card I used the basic masking technique. What a fun technique, and it really can give cards a little extra pizazz.

Have a good day!

Sunday, November 9, 2008

A Pet Sitter's Thank You

Wow...I can't believe I haven't posted anything since Halloween!

I made this card for our petsitter...


To make the pawprints on the yellow, I used my Fiskar's Paw Print Punch and then shaded it with ColorBox Chalk Ink. I did almost the same thing with the "medallion" paw, but just reversed the process. I inked up the background and then used the pawprint and circle punch to make the medallion. The patterned paper is Basic Grey (from their Urban Prairie line). I stamped that adorable cat (from Inkadinkado), stamped the Thank You (from Rubber Stampede) on a small piece of matching cardstock, and added the three Prima flowers and yellow/brown rhinestones from Michaels. I love this card!

Monday, October 27, 2008

The Final Frontier...


I made another card with this awesome alien from Stampabilties for my little sister. I used my word processing program to make the "You are a superstar!" tag. After coloring Mr. Alien, I cut him out, glued him onto the black "space" circle that was already stamped. The only thing I did not glue was his peace sign hand...instead I took a 3D dot and put it under his hand to give it a little dimension. After all that, I stamped a few stars (stamps by Fiskars) on the background, stamped three more on a separate piece of paper and cut them out and put Stickles on them! I just think he is out of this world!

Tuesday, October 21, 2008

A few cardboard-y cards...

...I think I am going to submit that word to Webster's dictionary. "Cardboard-y." I think that's a word? OK, so anyways! I made a few cards the other day using really natural cardstocks and whatnot. I was kind of in a "vintage, natural, collage-y (another made up word!)" mood, so I went with it and here is what I finished up with:


Love this stamp! (I was going to give the stamp back to you, Mom, but now I'm not so sure!!!) I "rediscovered" it as I was challenging myself to use stamps I don't use very often. The stamp is from Pacific Stamp Exchange (sadly out of business). And aren't those little waffle-like Prima flowers just adorable? Too cute.


This card was a lot of fun...mostly because I used the stamp I won for my honorable mention from Hero Arts (I wasn't even expecting a prize, so it was a surprise!) The ledger paper is from KI Memories Love, Elsie.

And this is the last card I made. I used Stampin' Up stamps (I got them at a garage sale a few years ago and hadn't used them) and some stamps by Stampedous (the bigger bees, "Bee Happy," and the flower background.) I stamped the flowers using VersaMark. And I have to give a huge "Thank You" to my hubby...he so sweetly stopped what he was doing at the time to color the beehive and bees for me since I had burned my thumb and pointer finger on the tops of the knuckles and couldn't hold a pencil! He's definitely a keeper!

Well, thanks for looking! Have a great day!

Saturday, October 11, 2008

The Letter A

I just love covering paper mache with adorable scrapbook paper, so when I saw this letter A half off at Hobby Lobby (it was only a buck!) I just had to get it! So, I covered it with Basic Grey paper, added some ribbon, and voila...an adorable A for my scrapbook desk!

SUPPLIES: Letter A- Hobby Lobby, Paper- Basic Grey, Ribbon- Michael's, Ink (for edges)- My Mind's Eye

Isn't this little alien just adorable!?! I love his peace sign, and what a goofy expression!


SUPPLIES: Alien stamp- Stampabilities, Word Stamps- KI Memories, Cardstock- DCWV, and I don't know who made the patterned paper! Sorry!


Saturday, September 27, 2008

I Can't Get Enough of You card


SUPPLIES Stamp by Penny Black, Patterned Paper by K&Company, Rhinestones by Kaiser Scrapbooks


I made this card for Zack the other day. I just used some of a little cardboard sheet that came with a pack of paper I bought and inked the edges of some cardstock for the saying stamp. Thanks for looking!