Thursday, November 27, 2008

Happy Thanksgiving!

I want to wish everyone reading this a very Happy Thanksgiving, and I hope that you have plenty of blessings to be thankful for! This year I sent out Thanksgiving cards, and while I am sure a few of them will be late (Sorry!) I wanted to share the card I made for Thanksgiving.


All stamps are Hero Arts. I just love this stamp set!

OK, I started by stamping the pumpkin on cream cardstock with VersaFine ink in Jet Black. While I waited for the ink to dry, I used the cream cardstock to make the card and inked the edges with Chestnut Roan ColorBox Chalk Ink. (I know, what a shock! I need to buy that ink pad in quantities I use so much of it!)

Next, I took the fall flourish and stamped it onto the card in Amber Clay Colorbox Chalk ink. I followed up with the Many Blessings to You stamp stamped in (wait for it...) Chestnut Roan Colorbox Chalk Ink.

Then, I took a dark brown piece of cardstock, stamped the fall leaf border all along it in VersaMark, and trimmed it down to about 2 1/2" x 4", used a corner rounder on the bottom corners, and inked it with, yet again, Chestnut Roan Colorbox Ink.

After that, I colored the pumpkin, trimmed it into a nice little square, rounded the corners, and trimmed a piece of green cardstock to have about a 1/8" border or so around the pumpkin piece. I inked them both with, of course, my Chestnut Roan ink, glued the pumpkin piece onto the gree piece. I adhered the pumpkin piece onto the card (with the brown piece already on there) with 3D Dots.

I forgot to take a picture before I sent the cards out, but on the inside of the card, I stamped Happy Thanksgiving in the center and then used the Turkey stamp that came with the set in the bottom right corner.

Thanks for looking! I hope your Thanksgiving was great and that you didn't overstuff yourself at dinner!

Tuesday, November 25, 2008

Warm Wishes Card using embossing resist


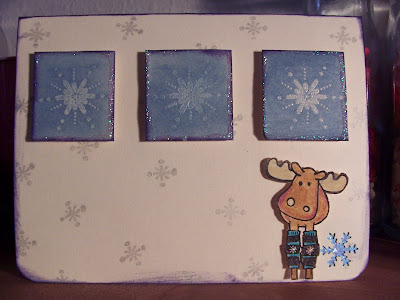
I made this card for a friend of mine...I used the snowflake from the Hero Arts Owl Christmas clear stamp set, and the moose, small snowflake (on background of card in silver) and polar bear are from a stamp set that WalMart has out for the holidays (only $2.97!!!!). I used my corner punch to round the edges of the card, and then punched a small snowflake (I used the Marvy small snowflake punch) out of the corner. I put a little piece of blue paper behind the snowflake punch. You can't see it very well in this picture, but the snowflake and a little bit of the moose's leg warmers are sparkly-I added some Crystal Stickles to the card to make it pop a little.

I stamped the Hero Arts snowflakes on the three pieces of cream cardstock with Brilliance Moonlight White Ink, heat embossed them with clear embossing powder, and used my ranger foam blender to blend some chalk ink over the stamp. It makes this really cool look. Then I added a little bit more stickles to the border of the three blocks. I adhered them with 3D dots, and adhered the colored moose with more 3D dots (but the thinner kind) to complete the card.

And because I just love getting adorable envelopes in the mail, I decorated the envelope to match the card. I stamped the snowflakes (from Hero Arts) with ColorBox Chalk color Blue Iris. I stamped the adorable little polar bear, and then used Gelly Roll Souffle Pen on his scarf to give it a little texture.

Oh, and here's a close up of the card (sorry the picture's not the greatest!):


Thanks for looking!

Tuesday, November 18, 2008

Thanksgiving decorations...

I got some stamp blocks in the mail yesterday from one of the ladies on TwoPeas, and immediately I thought of my new Thanksgiving Hero Arts clear stamp set I got.


The stamp blocks had the stamps taken off of them already, and I peeled the sticker off of the other side. Then, I painted the stamp blocks (I used Making Memories Nutmeg). I took a green sheet of cardstock, stamped the leaf stamp from the Hero Arts set using VersaMark, and let dry. As it dried, I took a cream piece of cardstock and stamped the other stamps using Color Box Chalk Ink in Chestnut Roan. I colored the pumpkin, the leaf, and the turkey, and cut them all out. I then inked the edges of all of them. I trimmed the green cardstock to fit each of the stamp blocks, inked the edges, adhered them using glue dots and a glue stick (I didn't want them to fall off!), and then put the cream cardstock images on using 3D dots. It turned out to be a quick, easy, and cute decoration!

Monday, November 10, 2008

A Parisian Love Affair...

Ever since I took french in high school, I have been in love with France, and especially Paris. I almost had the opportunity to go to Paris my senior year, but 9/11 happened so they cancelled the trip. And now, I have started to brush up on my French and I dream of the day that my husband and I take the trip there. It will be when we are retired most likely, and when I have overcome my fear of flying...but anyways. So until then, I have to comfort myself with looking at photos of Paris, dreaming of decorating my scrapbook room in a Parisian style, and most recently, making lots of cards with French script and the Eiffel Tower!

So, here are some of the cards I made:


The Eiffel Tower stamp is by Stampabilities, and the French Script stamp is by Hero Arts. All Patterned Paper is by Making Memories. On the second and third card, I used masking techiniques that I learned over at twopeasinabucket.com during their stamp camp. The link to the class is here. The second card I used the reversed masking technique on to create round area of french script, and the third card I used the basic masking technique. What a fun technique, and it really can give cards a little extra pizazz.

Have a good day!

Sunday, November 9, 2008

A Pet Sitter's Thank You

Wow...I can't believe I haven't posted anything since Halloween!

I made this card for our petsitter...


To make the pawprints on the yellow, I used my Fiskar's Paw Print Punch and then shaded it with ColorBox Chalk Ink. I did almost the same thing with the "medallion" paw, but just reversed the process. I inked up the background and then used the pawprint and circle punch to make the medallion. The patterned paper is Basic Grey (from their Urban Prairie line). I stamped that adorable cat (from Inkadinkado), stamped the Thank You (from Rubber Stampede) on a small piece of matching cardstock, and added the three Prima flowers and yellow/brown rhinestones from Michaels. I love this card!