Saturday, December 20, 2008

Christmas Goodie Bags

I made some treat bags for my husband's employees, and I just had to share them with you!


I made the tags using the clear stamp sets that were at WalMart. I started with cutting the blue cardstock, rounding the corners and using Martha Stewart Glitter on the edges. I stamped that adorable Moose on white cardstock with VersaFine Black Ink and set it aside (I didn't want to smudge the little guys!) Next, I took white cardstock, cut them into rectangles that were around 1/4" smaller than the blue cardstock and rounded the edges on that. I grabbed the cute tree stamp from one of those WalMart sets and used My Mind's Eye ink (a sage greeny color) to stamp four of the trees, leaving a spot for one more tree. Then I used masking to stamp the darker green tree (I stamped two tree images onto white cardstock, cut them out, and used removable Glue Dots and covered up the trees on each side of the blank spot.) After that, I used the "Happy Holidays" stamps from the Tree set, and stamped it with VersaFine Ink over the trees. I inked the edges of the white cardstock with VersaMagic Aegean Blue Chalk Ink. Then I colored those little mooses, cut them out, and adhered them using 1/16" 3D Dots. Then I adhered them to the blue cardstock, punched a hole using my Crop-A-Dile, and tied some cute ribbon through it...so cute!

For the bags, I just bought the white paper gift bags in the crafting section of WalMart, used the larger snowflake stamp from my Hero Arts Owl Christmas acrylic stamp set, and stamped in various places in VersaMagic Aegean Blue ink on the front of the bag. Then I inked the edges with the same ink (I've got a problem...I'm addicted to inking the edges. I just can't leave edges alone anymore!) When the ink was dry (which was really quick) I used my stardust Gelly Roll pen in clear and highlighted miscellaneous parts of the snowflake (you can't really see that in the picture though). I used three Hero Arts crystals on each bag and put them in the center of miscellaneous snowflakes. Tied the ribbon on, and Voila! Easy as pie! I did all 7 bags in a matter of maybe 30 minutes. Simple project that adds that homemade touch to your Christmas packaging!

All the bags together! I can't wait to fill them with goodies!

Thanks for looking! Have a great day, and keep warm!

Friday, December 12, 2008

Christmas crafts...I love this time of year!

Wow. I can't believe the last time I posted was November 27th. It has been a crazy few weeks. If you read my personal blog, you know what I'm talking about. If not, I'll fill you in! We moved the weekend after Thanksgiving. In fact, we didn't find out for sure until the Saturday of that weekend that we would be moving the next day! So, we've been getting settled into the new town and apartment. And now that things are nearing normalcy, I actually had some time to work on some artsy stuff! I love when I get to create...it's such a release.

So both of these projects are for my husband's assistant manager for Christmas. We are going to put some candy and stuff in the take out box for her, and I painted the little Santa ornament. About the ornament...I usually am HORRIBLE at painting things with any detail to it. But this one turned out really nice! (My mom says it is because I have more time and patience now...she's right!) I didn't paint the face, that comes prepainted but I did the rest!


I love this paper! It is from K&Company by Brenda Walton...so retro looking and adorable!

Thursday, November 27, 2008

Happy Thanksgiving!

I want to wish everyone reading this a very Happy Thanksgiving, and I hope that you have plenty of blessings to be thankful for! This year I sent out Thanksgiving cards, and while I am sure a few of them will be late (Sorry!) I wanted to share the card I made for Thanksgiving.


All stamps are Hero Arts. I just love this stamp set!

OK, I started by stamping the pumpkin on cream cardstock with VersaFine ink in Jet Black. While I waited for the ink to dry, I used the cream cardstock to make the card and inked the edges with Chestnut Roan ColorBox Chalk Ink. (I know, what a shock! I need to buy that ink pad in quantities I use so much of it!)

Next, I took the fall flourish and stamped it onto the card in Amber Clay Colorbox Chalk ink. I followed up with the Many Blessings to You stamp stamped in (wait for it...) Chestnut Roan Colorbox Chalk Ink.

Then, I took a dark brown piece of cardstock, stamped the fall leaf border all along it in VersaMark, and trimmed it down to about 2 1/2" x 4", used a corner rounder on the bottom corners, and inked it with, yet again, Chestnut Roan Colorbox Ink.

After that, I colored the pumpkin, trimmed it into a nice little square, rounded the corners, and trimmed a piece of green cardstock to have about a 1/8" border or so around the pumpkin piece. I inked them both with, of course, my Chestnut Roan ink, glued the pumpkin piece onto the gree piece. I adhered the pumpkin piece onto the card (with the brown piece already on there) with 3D Dots.

I forgot to take a picture before I sent the cards out, but on the inside of the card, I stamped Happy Thanksgiving in the center and then used the Turkey stamp that came with the set in the bottom right corner.

Thanks for looking! I hope your Thanksgiving was great and that you didn't overstuff yourself at dinner!

Tuesday, November 25, 2008

Warm Wishes Card using embossing resist


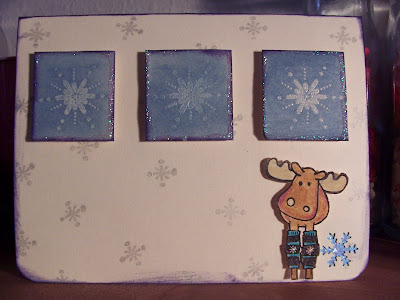
I made this card for a friend of mine...I used the snowflake from the Hero Arts Owl Christmas clear stamp set, and the moose, small snowflake (on background of card in silver) and polar bear are from a stamp set that WalMart has out for the holidays (only $2.97!!!!). I used my corner punch to round the edges of the card, and then punched a small snowflake (I used the Marvy small snowflake punch) out of the corner. I put a little piece of blue paper behind the snowflake punch. You can't see it very well in this picture, but the snowflake and a little bit of the moose's leg warmers are sparkly-I added some Crystal Stickles to the card to make it pop a little.

I stamped the Hero Arts snowflakes on the three pieces of cream cardstock with Brilliance Moonlight White Ink, heat embossed them with clear embossing powder, and used my ranger foam blender to blend some chalk ink over the stamp. It makes this really cool look. Then I added a little bit more stickles to the border of the three blocks. I adhered them with 3D dots, and adhered the colored moose with more 3D dots (but the thinner kind) to complete the card.

And because I just love getting adorable envelopes in the mail, I decorated the envelope to match the card. I stamped the snowflakes (from Hero Arts) with ColorBox Chalk color Blue Iris. I stamped the adorable little polar bear, and then used Gelly Roll Souffle Pen on his scarf to give it a little texture.

Oh, and here's a close up of the card (sorry the picture's not the greatest!):


Thanks for looking!

Tuesday, November 18, 2008

Thanksgiving decorations...

I got some stamp blocks in the mail yesterday from one of the ladies on TwoPeas, and immediately I thought of my new Thanksgiving Hero Arts clear stamp set I got.


The stamp blocks had the stamps taken off of them already, and I peeled the sticker off of the other side. Then, I painted the stamp blocks (I used Making Memories Nutmeg). I took a green sheet of cardstock, stamped the leaf stamp from the Hero Arts set using VersaMark, and let dry. As it dried, I took a cream piece of cardstock and stamped the other stamps using Color Box Chalk Ink in Chestnut Roan. I colored the pumpkin, the leaf, and the turkey, and cut them all out. I then inked the edges of all of them. I trimmed the green cardstock to fit each of the stamp blocks, inked the edges, adhered them using glue dots and a glue stick (I didn't want them to fall off!), and then put the cream cardstock images on using 3D dots. It turned out to be a quick, easy, and cute decoration!

Monday, November 10, 2008

A Parisian Love Affair...

Ever since I took french in high school, I have been in love with France, and especially Paris. I almost had the opportunity to go to Paris my senior year, but 9/11 happened so they cancelled the trip. And now, I have started to brush up on my French and I dream of the day that my husband and I take the trip there. It will be when we are retired most likely, and when I have overcome my fear of flying...but anyways. So until then, I have to comfort myself with looking at photos of Paris, dreaming of decorating my scrapbook room in a Parisian style, and most recently, making lots of cards with French script and the Eiffel Tower!

So, here are some of the cards I made:


The Eiffel Tower stamp is by Stampabilities, and the French Script stamp is by Hero Arts. All Patterned Paper is by Making Memories. On the second and third card, I used masking techiniques that I learned over at twopeasinabucket.com during their stamp camp. The link to the class is here. The second card I used the reversed masking technique on to create round area of french script, and the third card I used the basic masking technique. What a fun technique, and it really can give cards a little extra pizazz.

Have a good day!

Sunday, November 9, 2008

A Pet Sitter's Thank You

Wow...I can't believe I haven't posted anything since Halloween!

I made this card for our petsitter...


To make the pawprints on the yellow, I used my Fiskar's Paw Print Punch and then shaded it with ColorBox Chalk Ink. I did almost the same thing with the "medallion" paw, but just reversed the process. I inked up the background and then used the pawprint and circle punch to make the medallion. The patterned paper is Basic Grey (from their Urban Prairie line). I stamped that adorable cat (from Inkadinkado), stamped the Thank You (from Rubber Stampede) on a small piece of matching cardstock, and added the three Prima flowers and yellow/brown rhinestones from Michaels. I love this card!

Friday, October 31, 2008

Happy Halloween!

I have been waiting until today to post these pictures (mostly because I didn't want to put them up before my family got their cards and gifts!), so here they are! I made my little sister a Halloween surprise using one of those Take-Out Boxes. I bought the boxes at Hobby Lobby, covered it with paper and stickers from Hobby Lobby-Paper Studio, added some buttons, ribbons, and stickles, added a stamped image and sticker, and voila!


Here's the box stuffed full of goodies! What more could a ten year old want? (Besides lots more candy!)

And here is the card I made for my parents...


I just love these House Mouse Halloween stamps! What an adorable little mouse in his "make-shift" sheet ghost costume! Too cute! I got the template for the candy corn from Scrapbooks, Etc. magazine. Before putting the pieces together, I inked the edges to give it a little more depth... (all of these stamps are House Mouse stamps)

And before I go, here are a few more Halloween cards I made this year for family and friends!


Stamps are from Autumn Leaves and House Mouse, Patterned Paper from Paper Studio/Hobby Lobby, Flowers are Prima Flowers, and various Rhinestones.

Have a Happy and Safe Halloween!

Monday, October 27, 2008

The Final Frontier...


I made another card with this awesome alien from Stampabilties for my little sister. I used my word processing program to make the "You are a superstar!" tag. After coloring Mr. Alien, I cut him out, glued him onto the black "space" circle that was already stamped. The only thing I did not glue was his peace sign hand...instead I took a 3D dot and put it under his hand to give it a little dimension. After all that, I stamped a few stars (stamps by Fiskars) on the background, stamped three more on a separate piece of paper and cut them out and put Stickles on them! I just think he is out of this world!

Thursday, October 23, 2008

A Long Legged "Thank You"


I just love birds, and I especially love this long legged little guy! I can just imagine him walking along the beach as waves come and go. What a cute little bird! I made this card using that "cardboard-y" colored paper again, ribbon from American Crafts, and the Thank You sticker is from Pebbles, Inc. I inked the edges with ColorBox chalk inks, and colored the little guy in. Simple, quick, and so adorable! Thanks for looking!

Tuesday, October 21, 2008

A few cardboard-y cards...

...I think I am going to submit that word to Webster's dictionary. "Cardboard-y." I think that's a word? OK, so anyways! I made a few cards the other day using really natural cardstocks and whatnot. I was kind of in a "vintage, natural, collage-y (another made up word!)" mood, so I went with it and here is what I finished up with:


Love this stamp! (I was going to give the stamp back to you, Mom, but now I'm not so sure!!!) I "rediscovered" it as I was challenging myself to use stamps I don't use very often. The stamp is from Pacific Stamp Exchange (sadly out of business). And aren't those little waffle-like Prima flowers just adorable? Too cute.


This card was a lot of fun...mostly because I used the stamp I won for my honorable mention from Hero Arts (I wasn't even expecting a prize, so it was a surprise!) The ledger paper is from KI Memories Love, Elsie.

And this is the last card I made. I used Stampin' Up stamps (I got them at a garage sale a few years ago and hadn't used them) and some stamps by Stampedous (the bigger bees, "Bee Happy," and the flower background.) I stamped the flowers using VersaMark. And I have to give a huge "Thank You" to my hubby...he so sweetly stopped what he was doing at the time to color the beehive and bees for me since I had burned my thumb and pointer finger on the tops of the knuckles and couldn't hold a pencil! He's definitely a keeper!

Well, thanks for looking! Have a great day!

Thursday, October 16, 2008

Missy and Cassie Mini Album!

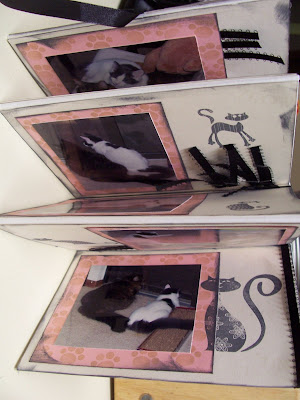
I had tons of pictures of the two of my cats and didn't know where to even start with them, so I decided to make a mini album for the pictures of my two cats together. I love this little album! I kept everything pretty simple, and used the same patterned paper for the box and the front page of the album. On the rest of the pages (the photo pages) I used Inkadinkado Cats stamps- VersaMark "Meow" on cream paper, light brown chalk ink paws on the pink photo background, and a grey chalk ink cat on the page. Finished it up with some black ribbon and some grey chalk ink around all the edges, and voila! Super cute little cat album!


SUPPLIES Stamps by Inkadinkadoo, Ink by Colorbox, Ribbon by Offray, Patterned Paper by My Mind's Eye, Flowers by Prima, Rhinestones by Queen & Co., Stickles

Thanks for looking!

Saturday, October 11, 2008

The Letter A

I just love covering paper mache with adorable scrapbook paper, so when I saw this letter A half off at Hobby Lobby (it was only a buck!) I just had to get it! So, I covered it with Basic Grey paper, added some ribbon, and voila...an adorable A for my scrapbook desk!

SUPPLIES: Letter A- Hobby Lobby, Paper- Basic Grey, Ribbon- Michael's, Ink (for edges)- My Mind's Eye

Isn't this little alien just adorable!?! I love his peace sign, and what a goofy expression!


SUPPLIES: Alien stamp- Stampabilities, Word Stamps- KI Memories, Cardstock- DCWV, and I don't know who made the patterned paper! Sorry!


Tuesday, October 7, 2008

Some more Stamptoberfest challenges...


A card I made for Zack...and it fit into the Use 3 things challenge (ribbon, stamp, and patterned paper!)

And these were the first "fat book" pages I made! I love these!

Second fat book page!

Monday, October 6, 2008

Some of the cards I made for Stamptoberfest...

...over at Two Peas in a Bucket. Stamptoberfest runs 10/3 to 10/12, and I love all the challenges. It's making me think a little outside the box. So, here are some of the halloween cards I made. I'm usually not one to celebrate much of halloween (since it is only Zack and I), but I loved these little stamps! They are from House Mouse. So cute!


Friday, October 3, 2008

Welcome Home LO

Hi everyone! So I got a few layouts done despite my scrapbooker's block! I am still catching up on all the photos from our move to Iowa and even previous to that (I used to always be on top of my photos, but they have really piled up!)

This is one of those Layouts I did where at first I was kind of like "Eh..." but then I started doodling the Iowa words on the first page and made the "Home" part of the title and now I love it!


SUPPLIES Patterned paper by K&Company, Brads by JoAnn's Scrap Essentials, Cardstock by Bazzill, Letter stamps for "WELCOME" by Inkadinkado

I also got a page done on our new apartment in Cedar Rapids. I just love the Home Bingo Card by Jenni Bowlin Studios. So cute!


SUPPLIES HOME Bingo Board by Jenni Bowlin; Patterned paper by Love, Elsie; Cardstock by Bazzill; Pro/Con Journaling Block by 7Gypsies; Brads by Making Memories

Thanks for looking!